4.1 Using a separate audit database
If you want to store the audit information in a separate database from the main MyID database, you can set up MyID to use a dedicated audit database.
To create a separate audit database:
-
Run the MyID installation program.
Note: If you need more than one additional database (for example, an audit database, an archive database, and a binary database) you must run the installer from a PC that does not have MyID installed.
You do not want MyID installed on the PC, as you do not want to change any of the installed components – all you want to do is use the Archive Database Server option to create an additional database.
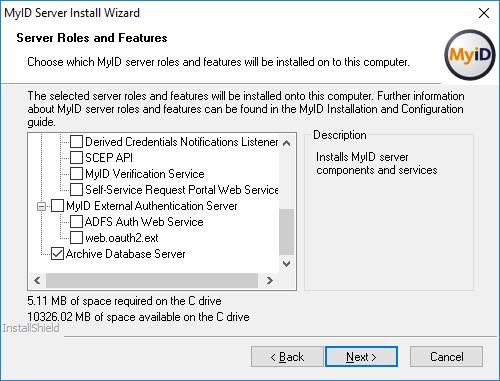
-
At the Server Roles and Features screen, select the Archive Database Server option:

Note: Do not select any of the other options.
- Click Next.
-
Type the User Name and Password for the MyID COM user, then click Next.
The MyID Archive Database Installation screen appears:

-
Select the Database Server from the drop-down list.
For example. MyID_Audit.
- Type the Database Name for the new database.
-
Click Next.
Important: When the installation has completed, if you have any updates installed on your system, you must apply them to the new database to ensure that the structure and operation data of the additional database matches the main database.
-
On the MyID application server, update the audit .udl file to point to the correct database:
- Open a Windows command prompt as an Administrator.
- Navigate to the Windows System32 folder.
-
Type the name of the audit.udl file, then press Enter.
The audit .udl filename has the format:
<databasename>audit.udl
where <databasename> is the name of the main MyID database ; for example, MyIDaudit.udl
This opens the Data Link Properties dialog, which allows you to change the data link file.
- Set the properties to point to the server and database you created to store the audit information.